I have long said that upgrading a bike to clipless pedals is the single greatest upgrade you can make to a bike. I also remind friends and customers that unlike most other upgrades, it is one that you will take with you to your next bike. So while it may not be worth spending $500 on a new suspension fork and putting it on a $300 bike, spending a little extra on the pedals is well worth it because they will look just as nice on your next bike.
All this really hit home when one the guys here asked me about a set of pedals I was putting on my new road bike, and I realized that I had had them for about 13 years. There are all sorts of stories here, but let me run through some examples of pedals I have owned and I think you will see where I am going with it.
First clipless pedals were $30 cheapie SPD style Welgos I bought online. Rode them on my mountain bike and destroyed them in a season, repurchased them and destroyed the second set as well.
Time MTB pedals - Started running Time's on a recommendation from a teammate. Due to cash constraints I bought the less expensive Time ATAC pedals. Loved the system but found myself destroying them regularly. It was to the point where I had a box of spare pedals and if ever I had both a left and a right pedal in there I would run them as a set. Finally I sprung for the Time World Cup Pedals which were times high end version of the same pedal I was riding. I didn't think about it at time, but as the World Cups quietly worked on one of my bikes I continued to destroy the others on my other bike.
Ended up selling all my pedals (including the World Cups) when I switched to Crank Brothers as I was frusterated with breaking so many pedals.
Crank Brothers- Landed a sponsorship deal with Crank Brothers and was riding two sets of EggBeater Twin Ti. pedals which were one step off of the top of the line. After countless 24 hour races, thousands of hours of training, and more abuse than I care to mention, I am still riding these pedals after over 11 years. Naturally I was really happy with them and have been singing the praises of Eggbeaters. A few years ago I brought my wife on board and bought her a cheap set (MRX) of Eggbeaters for her occasional riding, I also had a second set that I was going to put on my commuter, but never got around to it until a year and a half ago. In about a year of commuting on the MRX I destoyed a bearing and cracked the shell on the pedal, and if finally dawned on me.
I was not breaking pedals because of the brands, I was breaking pedals because of the quality I was purchasing from that brand.
Suddenly spending $200 on a pedal that will last 10 or more years and outlast 3 bikes makes more sense than buying a new set of $60 pedals every year.
In summary:
Nice Twin Ti Eggbeaters - 11 years and counting
Nice Look Road pedals - 13 years and counting
$180 Times - Rode for 2 seasons and then sold them in good condition.
$30 wellgo's - Less than a season and done
$60 Time's - about a season
Conclusion: Buy nice pedals. It is well worth the investment.
Monday, July 23, 2012
Thursday, July 5, 2012
Rookie Mistake, Pro Save
Ok, we have all been there, you get in a hurry and do something dumb. So if you need to feel better about yourself, here is my dumb story and the trailside fix that let me take my son on his first mountain bike ride rather than pack it up and go home.
So here is the short version of the mess up. Going to take my son mountain biking, but running behind. Pump up rear tire. Pump up Front tire but there is a problem at the valve and it is losing air.
Discover that the valve has separated from my stan's tubeless rim strip.
Remove rim strip.
Forget to sweep the tire. (note: if you are running tubeless with Stan's solution, just because you didn't go flat doesn't mean there are no thorns in your tire. I find that there are ALWAYS thorns in my tire, which make me even dumber for not sweeping it out)
Put in spare tube.
Grab Spare tube and saddle bag off wifes bike
Go to park.
Discover that tube in now flat and leaking rapidly when inflated.
Choose now as a time to remember that wifes bike has schraeder valves so I can't use her spare tube. Also a good time to notice that her patch kit has rubber cement that is no longer usable.
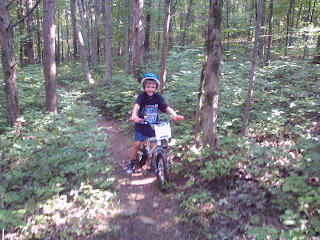
Now we are at the decision point, go home or try something drastic. I will have you know that Lane and I rode for 5 miles which is what made this picture possible.
Also know that the fix lasted not only for the five mile ride, but also sat in my garage overnight, and made the 15 mile commute into work the next day without having to re-inflate.
So if you get in a bind and need to fix a flat tire without a spare tube or a patch, this is one of my favorite trailside fixes. This is the second time it has bailed me out, but you can check out the pictures of us undoing the fix at the shop the next day....
 Photo 1: Me riding in the shop on the temporary fix which has been holding for over 24 hours
 The reveal of how the fix was accomplished....

The 26" Tube which was tied in a knot to make what amounts to a 22" tube which can be stretched to fit a 26" wheel / tire. Small section of the tire that would have a flat spot due to not having air in it is counter balanced by the extra rubber from the knot and the part of the tube with the hole. As long as you tie a nice tight knot this fix rides well and gets you back on the trail. Hope this saves a ride for you sometime.
So here is the short version of the mess up. Going to take my son mountain biking, but running behind. Pump up rear tire. Pump up Front tire but there is a problem at the valve and it is losing air.
Discover that the valve has separated from my stan's tubeless rim strip.
Remove rim strip.
Forget to sweep the tire. (note: if you are running tubeless with Stan's solution, just because you didn't go flat doesn't mean there are no thorns in your tire. I find that there are ALWAYS thorns in my tire, which make me even dumber for not sweeping it out)
Put in spare tube.
Grab Spare tube and saddle bag off wifes bike
Go to park.
Discover that tube in now flat and leaking rapidly when inflated.
Choose now as a time to remember that wifes bike has schraeder valves so I can't use her spare tube. Also a good time to notice that her patch kit has rubber cement that is no longer usable.

Now we are at the decision point, go home or try something drastic. I will have you know that Lane and I rode for 5 miles which is what made this picture possible.
Also know that the fix lasted not only for the five mile ride, but also sat in my garage overnight, and made the 15 mile commute into work the next day without having to re-inflate.
So if you get in a bind and need to fix a flat tire without a spare tube or a patch, this is one of my favorite trailside fixes. This is the second time it has bailed me out, but you can check out the pictures of us undoing the fix at the shop the next day....


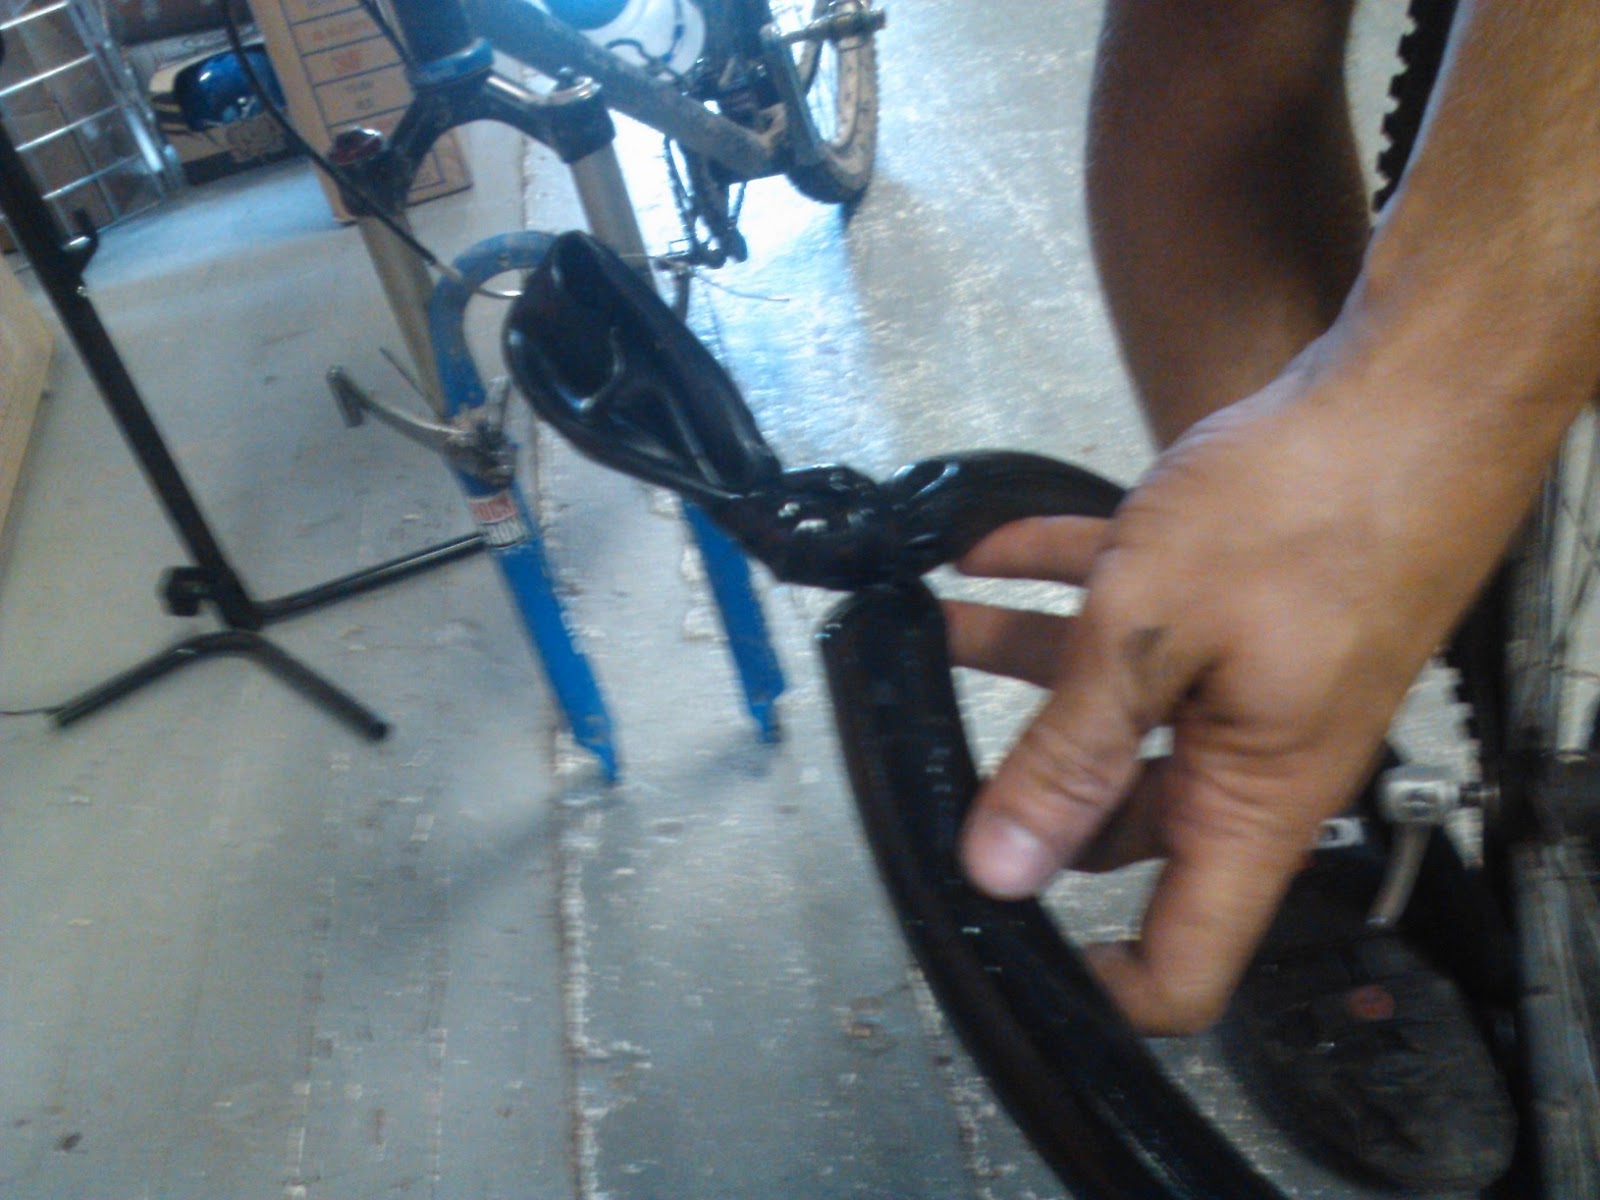
The 26" Tube which was tied in a knot to make what amounts to a 22" tube which can be stretched to fit a 26" wheel / tire. Small section of the tire that would have a flat spot due to not having air in it is counter balanced by the extra rubber from the knot and the part of the tube with the hole. As long as you tie a nice tight knot this fix rides well and gets you back on the trail. Hope this saves a ride for you sometime.
Subscribe to:
Posts (Atom)